Table of contents
- Introduction
- PCS constraints
- Create new reference train view
- Draft
- Reference train header
- Location fields
- Times
- Train activity type
- IDs
- Note
- Owner IM
- Territory details
- Path request details
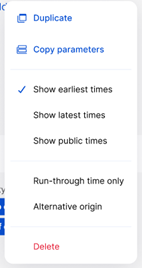
- Alternative origin or destination
- Displaying day change, offset and time zone change
1. Introduction
This document describes only the journey step in the creation flow. It will not contain the management of the territories and locations, and the following steps of the creation flow.
2. PCS constraints
Basic rules of minimum elements in the Journey creation:
- A reference train must have at least one territory.
- A territory must have at least one path request.
- A path request must have at least two locations
3. Create new reference train view
The creation flow begins by editing the basic data and defining the minimum locations (origin point, destination) to begin building the Journey. Users can give the “via” points to reach the destination if needed.
3.1 Basic rules
- The creator of the path request becomes the leading applicant who is used as the default applicant for all territories at the beginning
- A territory is created based on the selected locations
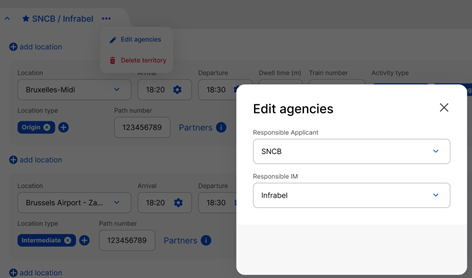
- The owner IM of the location of all territories is prefilled and cannot be edited
- Only the responsible IM can be chosen by the leading applicant and can be edited
- The locations are displayed from origin to destination (top to bottom)
Leaving the Create New Reference train’s first view after providing the basic data, users get to the second screen where they can start building the journey.
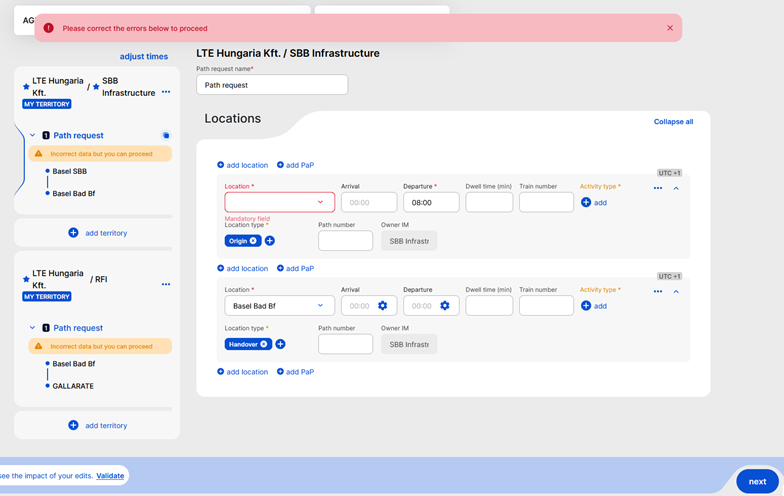
On the second view of the creation flow where the Journey step starts for the first time, and users can start the creation of the path request. This is the only view where the path request is available for editing in one view for all territories where the territory card does not exist yet.
The view starts with two cards on top:
- The reference train card
- Steps of the creation flow, which displays which step the user is on
4. Draft
The user starts editing the Journey until it does not finish all the steps of the Journey creation flow, the reference train is in draft state:
- Only the logged-in user (not the agency) can see the draft of the reference train.
- If the user navigates away from the basic data screen or chooses to cancel on the basic data screen, the reference train is discarded.
- The reference train card three-dot menu has the delete option only in this state.
- When the user opens a draft reference train, they are returned to the beginning of the journey flow, where the already added data is included.
As long as the reference train is in the Open phase, it can be deleted from the three-dot menu of the reference train card. This action cannot be undone.
5. Reference train header
The most important identifiers of the reference train are available in the header.
PCS ID: Unique system-generated number that is generated when the reference train is created with a max 6-digit value starting with 100000 and incremented with each created reference train.
The header can be collapsed and opened only in edit mode. If the reference train is in read-only mode, it cannot be collapsed; it always appears expanded and displays all the data it contains.
.

Below these top 2 cards, the list of location cards is displayed for editing.

The user can add a new territory, location, or border section on this screen or delete them.
Adding a border section is only available on this screen.
The users here cannot add or remove path requests on this screen.
6. Location fields
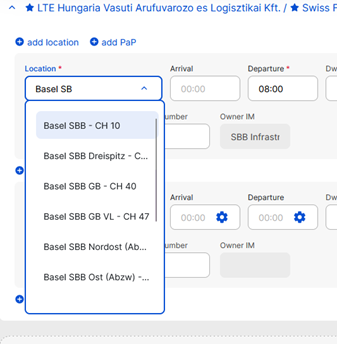
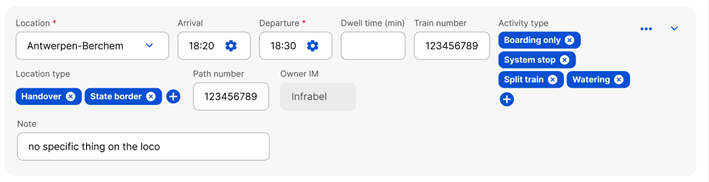
- Location: is a dropdown field with the name of the location. The location code is also shown in the dropdown, but only the location name is displayed on the card, and code is visible on hover
The location cannot be empty; otherwise, an error is shown below the field. If the user tries to use the Next button, a banner with the error will appear on top for a few seconds.
- Location type: Labels of the location type. Mandatory field. The default value is None. The following combinations are not allowed, and a warning is shown:
- Origin and Destination
- Origin and Intermediate
- Destination and Intermediate
- None can be combined with any other type
If the IM has disabled the “None” value, the field is empty by default because it is mandatory to fill.
- 08 None: This is the default value. If this location type is selected, all fields in the Location details sidebar are visible.
- 01 Origin
- 02 Intermediate
- 03 Destination
- 04 Handover
- 05 Interchange
- 06 Handover and Interchange
- 07 State Border
- 09 Network Border
- 99 Mutually Defined
7. Times
- Arrival: Optional field.
- Departure: departure time at the first location of a path request is mandatory. Otherwise, the departure time is optional.
- Run-through time only: If this is selected, only the run-through time input field is visible in the times group (removing any arrival, departure fields and the dwell time field).
Persistent selection. If any of the “Show earliest/latest/public” times options are selected, the selection of the “Run-through time only” is removed and any value added in the field is removed.
- Show earliest/latest/public times: Earliest Arrival, Latest Arrival, Public Arrival, Earliest Departure, Latest Departure, Public Arrival, Public Departure. This selection is only persistent if there is a value added to the field. If the Run-through time only option is selected, the selection of the Show earliest/latest/public times and any values added in the fields are removed.
- Dwell time: The minimum train stop time at a given location. Dwell time is checked against the Departure time minus the Arrival time. Dwell time accepts digits, for example, 21.5 minutes is 21 minutes and 30 seconds.
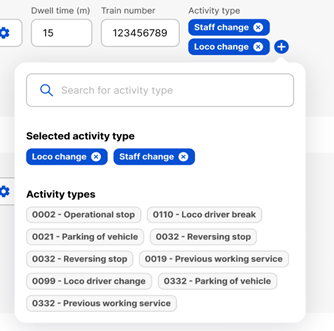
8. Train activity type
A list of activity types is displayed. There are a minimum of 47 types, and IM-specific activities can be added. The activities are searchable by code in the search popup, but only the name is displayed on the location card.
9. IDs:
- Path number: The path number that is used in the national system. Min 1, max 9 characters, string.
Special path number editing exceptions:
- Applicant (request)
- Applicant can edit the path number on the PaP location in case the published PaP location does not have a path number (it is empty)
- Applicant can edit every non-PaP location path number
- Applicant can’t edit if the PaP has a path number
- RFC (PaP request):
- RFC can edit the path number always (when RFC can edit anything, e.g. Prebooking, and alternative flow)
- IM (offer)
- IMs can always edit (on offers)
- Applicant can edit the path number on the PaP location in case the published PaP location does not have a path number (it is empty)
- Train number: The train number that is used in the national system. If a new location card is created empty, prefill it with the international train number of the reference train. The user can update this with the OTN.
10. Owner IM
Read-only parameters. The responsible applicant and responsible IM cannot be modified on a location level, only on a territory level.

11. Note
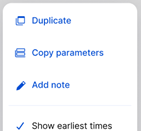
Optionally, a note can be added to a location from the three-dot menu of the location card. The Note field is up to 255 characters and is only shown on the expanded location card if it contains any data.
12. Territory details
The validation rules are the same as for the existing territory. The following fields must be defined; otherwise, the user gets a blocker error, and the territory cannot be created:
- Responsible Applicant
- Responsible IM
- Origin location
- Destination location
- Departure time at the origin location
A maximum of 10 territories can be added.
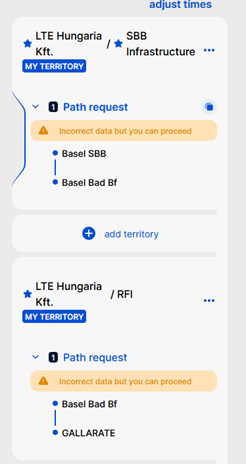
Neighbouring territories cannot have the same RA-RIM pair. If a new territory would lead to a result like that, an error is displayed, and the new territory is not created.
13. Path request details
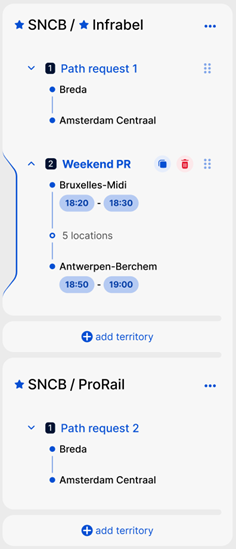
The next view in the Journey step is the path request view, where users can see their path request details.

Path requests are grouped by territory on the left, with a quick view of the origin and destination. When a path request is selected, the details of the included locations are displayed.
The location cards are expanded by default but can be collapsed one-by-one or in bulk. The name of the path request can be changed, and the field can be edited.
Path requests are numbered in order in each territory.
Path requests can be reordered within a territory by grabbing and dragging the dotted area.
In this case, the numbering is adjusted according to the new path request order.
14. Alternative origin or destination
A location can be marked as the alternative origin or destination from the three-dot menu on the location card.
The first location of a territory can be defined as an alternative origin, and the last location of a territory as an alternative destination.
If a location is added before the alternative origin or after the alternative destination, then the alternative origin or destination flag is removed by PCS.
On the user interface, a checkbox is displayed in these cases:
- If a location is a first in a territory, mark it as an Alternative origin
- If a location is the last in a territory, mark it as an Alternative destination
Except:
- If a location is the first location in the first territory, then it cannot be defined as an alternative origin.
- If a location is the last location in the last territory, it cannot be defined as an alternative destination.
Alternative origin or destination marking is displayed on the location card with an icon:

15. Displaying day change, time zone and day offset
The user can click the cogwheel icon on time settings to bring up a modal, offset can be set up.

The manual offset field allows only positive values and is set to 0 by default. The value set for an arrival or departure appears next to the displayed time. Offset can only be set from the second location of each territory.

If the day change happens naturally in the journey, the offset is automatically calculated. The automatically calculated offset and the user-defined offset are added to define the offset for the time. The badge is applied automatically to the location and subsequent locations with the following rules for the automatic offset calculation:
- If the actual arrival or actual departure or run-through time on a location is later than the actual arrival or actual departure or run-through time on the next location, then PCS applies a +1 day offset from the arrival or departure time, respectively
- If the arrival time on a location is later than the departure time at the same location, then PCS applies a +1 day offset from the departure time
The time zone is displayed on the location card as shown below.
The time zone of a location is set based on the location information.
The times are handled in UTC, which is a constant frame of reference (there are no seasonal changes, timestamps are always reflecting standard time with an offset).
Local and seasonal changes are handled operatively, outside of PCS (for example, the train waits for an hour or is skipped depending on the change).

By default, the time zone settings are applied based on the country of the owner IM of a location. E.g. a request contains “Oradea” as location, the time zone will be automatically set to UTC+2.