Table of contents
- 1. Introduction
- 2. Ways of creating new reference trains
- 3. Field validation
- 4. PCS constraints
- 5. Creation of a new blank reference train
- 6. Path request creation flow steps
1. Introduction
This document describes how to create a basic reference train, the PCS constraints, field validation rules, and the Create New Reference Train view, where you can enter basic data to start the creation process.
2. Ways of creating new reference trains
Users can create a basic new reference train in two ways:
- Creating a new, blank reference train, starting the creation flow
- Opening a draft, an already started request that has not yet been finished to submit
3. Field validation
The following general rules apply during the creation steps and the validation of the information entered:
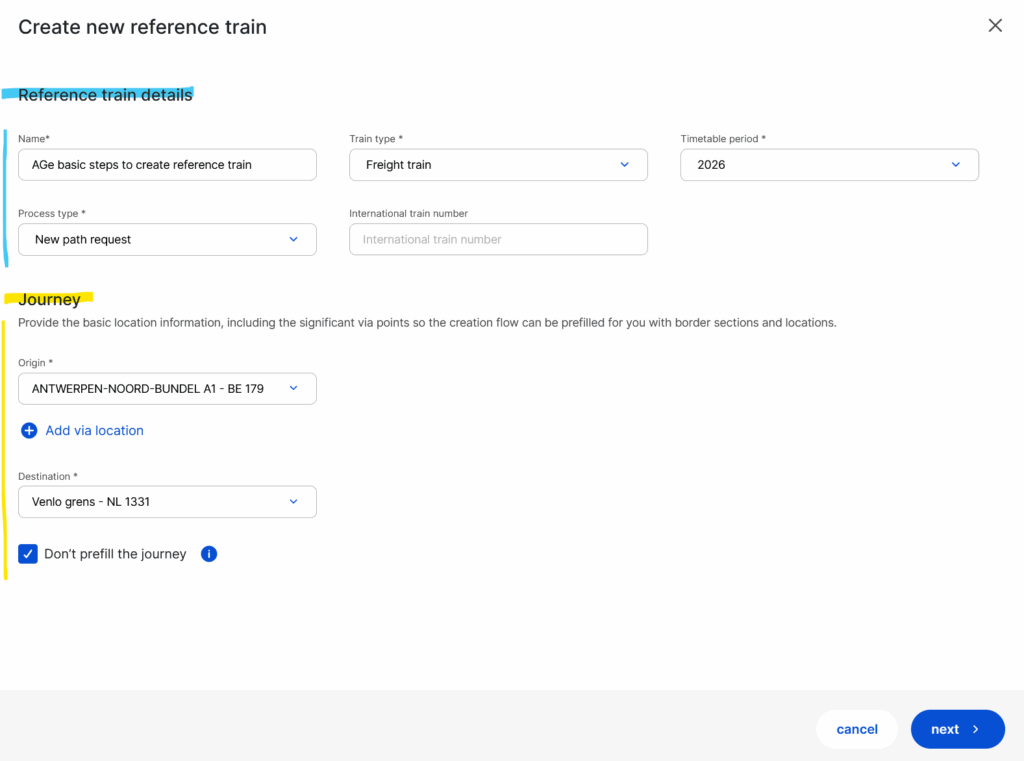
- Required fields are indicated with red-coloured asterisks; users must fill them in to save their action and continue.
- Mandatory fields are shown with yellow-coloured asterisks; users can set up a draft request in the Open phase with minimum data and with the minimum required mandatory information in Harmonization, and can return to modify the request later.
4. PCS constraints
There are constraints defined in the system that users should follow to create the reference train:
- You must define the departure time for the first location on each territory
- Every territory must have a minimum of two locations defined
5. Creation of a new blank reference train
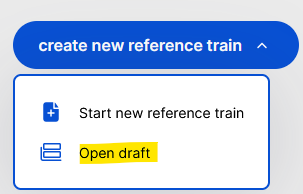
To create a reference train, users need to click the “Create new reference train” button group and select the “Start new reference train” button to start the creation process. The button is available after logging in on the dashboard.
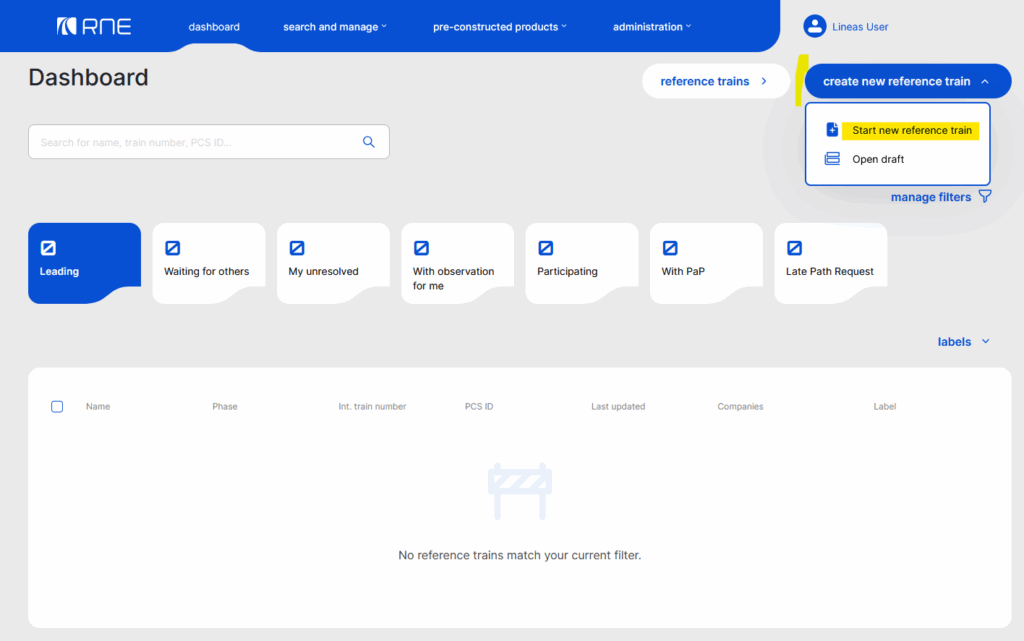
By default, the applicant creating the reference train becomes the leading applicant of the new reference train.
The leading IM of the reference train is selected according to the following priority:
- The IM pair of the creator applicant
- The first IM if the applicant has multiple IM pairs
- The preferred IM of the creator applicant, if this IM is participating in the reference train
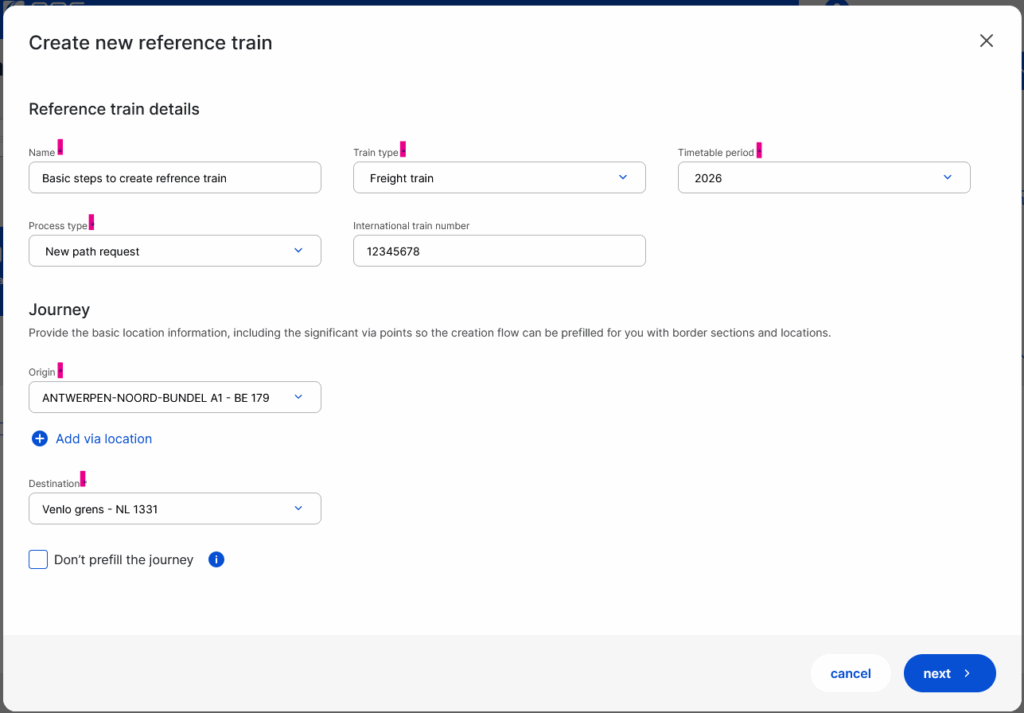
5.1 Create new reference train view
The create new reference train view consists of two separate groups where the basic data should be entered.
- Reference train details group
- Journey group
5.1.1 Description of the Reference train details group fields
The reference train details group consist of the following fields.
Name: Mandatory to fill. Descriptive name of the reference train. The name can contain a maximum of 200 characters (any character)
Process type: Mandatory to fill. The type of booking process that is started as a result of the reference train creation. This field will only have one value, and the value pre-filled by the system based on the selected timetable period and the current date, as it is written in the PCS timetabling process calendar.
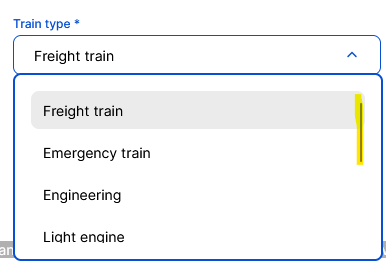
Train type: Mandatory to fill. Train types are filtered according to the user’s agency subtype. Users of the Cargo subtype can create all types of trains except passenger trains. Users of the passenger subtype can create all train types except cargo and maintenance trains.
Note: Those agencies which work with both train types and are registered as such in PCS can choose the train type from the drop-down list. The default type is pre-selected on the agency level by RNE Administrators but can also be indicated on the user level in the user settings. Once the reference train is created, it cannot be changed.
International train number: The IM or AB provides the leading applicant with the international train number. The field accepts a minimum of 1 and a maximum of 8 digits in number format. On the next view, this value defaults to the OTN train number field, which can be corrected by the applicant to reflect the real OTN number.
Timetable period: Mandatory to fill. The year that the timetable applies to. The number of available options in this field changes depending on where the user is in the business process period. The default value is the latest available TTP in the future.
5.1.1.1 Supported train types
The following supported train types exist in PCS:
- 0 Other train
- 1 Passenger train
- 2 Freight train
- 3 Light engine (locomotive train)
- 4 Engineering train
- 5 Emergency train
- 6 Mixed train (passenger and freight train in combination)
Scroll for more train types in the drop-down.
5.1.2 Description of the Journey group
Users should provide the basic location information, including the significant via points, so the creation flow can be prefilled for you with border sections and locations.
Origin: Mandatory to fill. The starting point of your route. It is used in combination with the destination field value to provide a suggested route.
+ add via location: A maximum of 2 locations can be added on this screen. The rest of the locations can be added in the next steps. With this option, users can add the requested border point to cross.
Destination: Mandatory to fill. The last point of your route. It is used in combination with the origin field value to provide a suggested route.
Don’t prefill the journey: The system only prefills the journey with the Origin, Destination and any added via point values and does not suggest any other locations. This is useful if the leading applicant intends to use PaPs to construct the journey. By default, the checkbox is set not to prefill the journey, but users can enable prefilling the journey by removing the checkbox.
5.2 Opening a draft
You may have already started creating a new reference train, but for some reason, you have not finished creating it. In this case, PCS automatically saves it as a draft version.
If you have already filled in the reference train details and journey and clicked the “Next” button, the system saves your action, and the reference train will be listed among the drafts later to continue.
There are two ways to access drafts:
- Go to “Search and manage” in the main menu and select the “Drafts” submenu
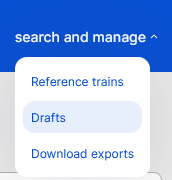
- Or from the “Create new reference train” button group
6. Path request creation flow steps
The path request creation consists of the following steps:
1. Journey creation (video only)
2. Calendar
3. Adding Network-Specific Parameters
These steps allow the user to provide the required data to create the basic reference train.
Please click the link to read more about each step.